

Data Transforms
How it works
When a CSV file is uploaded, CSVbox parses the data and applies your transformation logic row by row or cell by cell. The JavaScript function you write defines how each row or field is transformed. Once the transformation is complete, the modified data passes to the next stage for validation. There are two types of Data Transforms:- Row Transforms: apply logic to each row individually, from top to bottom. Use them when one cell depends on other cells in the same row, for example to combine several cells into one or to run a calculation that needs input from different columns.
- Column Transforms: apply logic to one or more selected columns at once. Use them when you need to analyze or modify the column as a whole, for example to find duplicate entries and replace each one with a unique identifier. They suit sorting, aggregation, and deduplication.
Row transforms
Adding row data transforms
1
Open the Data Transforms tab
On the edit sheet page, go to the Data Transforms tab and click Add Transforms.
2
Name the transform
Enter the transform Name.
3
Choose the Row type
Set Transform Type to Row.
4
Add the code
Provide the Javascript code.
5
Attach dependencies (optional)
Attach Dependent libraries.
6
Save the transform
Click Save.
Row transform examples
Append text
Append a constant to the cell value.Normalize dates
Normalize a date value into US format.Variables in the row transform
Thecsvbox object gives you access to the following data.
csvbox.row
Contains the row data. Access each cell by its column name:
csvbox.user
Contains the custom user attributes defined when initializing the importer:
csvbox.import
Contains data about the current import:
csvbox.columns
Contains the column metadata (name, type).
csvbox.environment
Contains the environment variables passed during importer initialization.
Column transforms
Adding column data transforms
1
Open the Data Transforms tab
On the edit sheet page, go to the Data Transforms tab and click Add Transforms.
2
Name the transform
Enter the transform Name.
3
Select the columns
Add the Columns you need for the transform.
4
Add the code
Provide the Javascript code.
5
Attach dependencies (optional)
Attach Dependent libraries.
6
Save the transform
Click Save.
Column transform examples
Example 1
Capitalize text fields:Variables in the column transform
Thecsvbox object gives you access to the following data.
csvbox.column
Contains the entire column data. Access each cell by the column name and the row number. The row number starts with 1.
csvbox.user
Contains the custom user attributes defined when initializing the importer:
csvbox.import
Contains data about the current import:
csvbox.environment
Contains the environment variables passed during importer initialization.
csvbox.columns
Contains the column metadata (name, type).
console.log(csvbox);
Use this statement to print all the available variables in the debugging console.Dependencies
The transform JavaScript can use an external library hosted on a CDN, and it can call any external API endpoint to fetch real-time data. Add the library script tag and any custom scripts to the Dependencies section, then use them in the main JavaScript snippet.Execution time
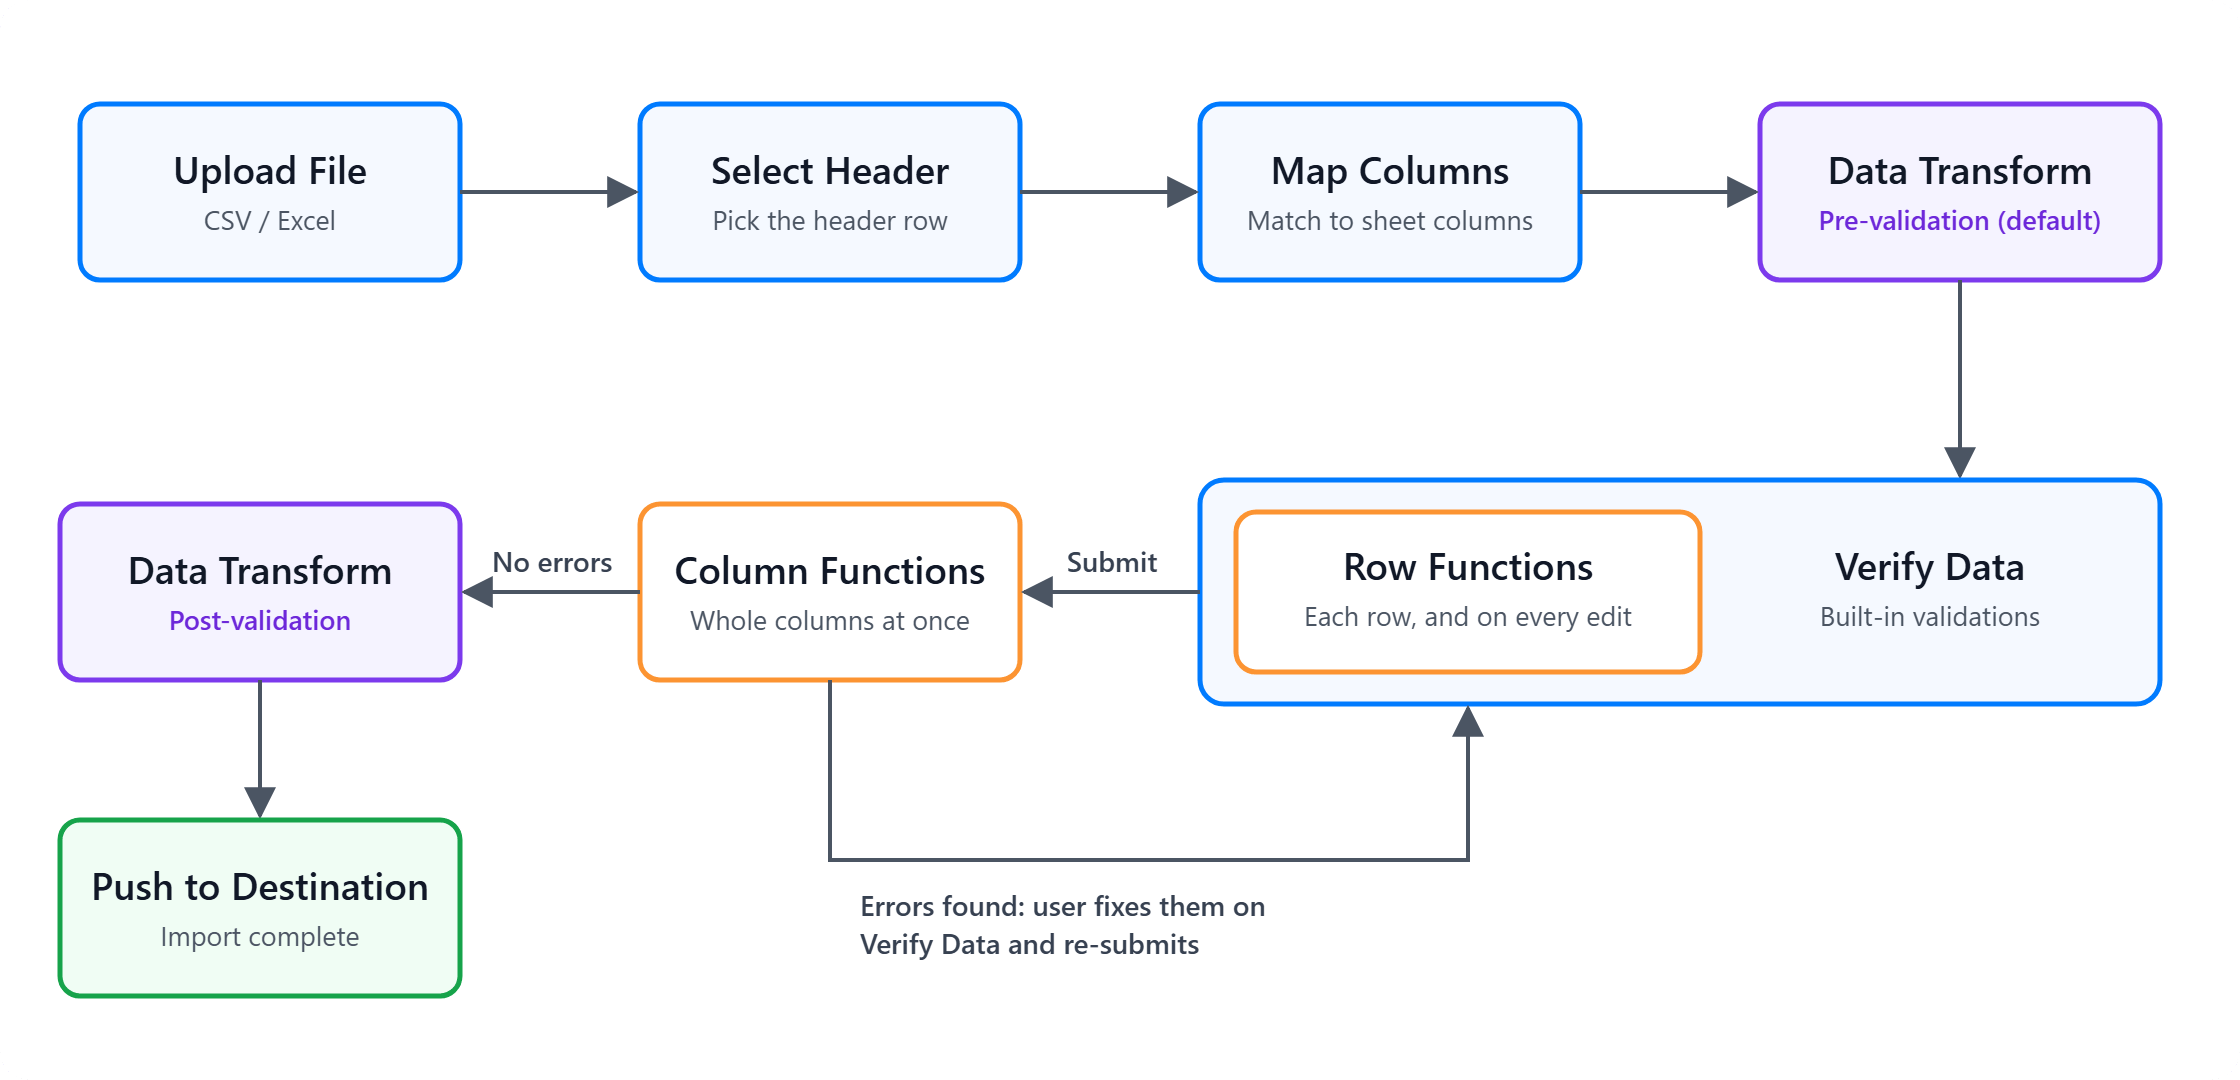
Every Data Transform runs at one of two stages in the import pipeline, so you control when it runs:- Pre Data Validation (default)
- Post Data Validation
Pre-validation data transform
Runs immediately after column mapping and before Data Validation. Use it for:- Cleaning or normalizing user input
- Converting formats (dates, numbers, booleans)
- Combining or splitting fields
- Setting defaults
- Preparing data that validators depend on
" 23.4500 " into a clean numeric value before your validation rules run.
Post-validation data transform
Runs only if there are no validation errors, just before data is pushed to the final destination. Use it for:- Final formatting
- Destination-specific transformations
- Generating or enriching fields only when the row is already valid
- Preparing computed values needed only for storage
slug or UUID, or apply pricing markup, after all validations pass.
Where to configure execution time
When you create or edit a Data Transform:1
Open the Data Transforms settings
Open Sheet Settings → Data Transforms.
2
Select a transform
Select an existing transform or create a new one.
3
Choose the execution time
Set Execution Time to Pre Data Validation or Post Data Validation.
4
Save your changes
Save the transform.
Key features
- JavaScript-powered: write custom JavaScript to operate on your data. With access to native JavaScript methods, you can implement anything from basic modifications to complex logic.
- Real-time execution: transformations are applied as the file is uploaded, so data is processed and adjusted before it enters your app.
- Versatile: handle a wide range of operations, such as:
- Modifying string data (for example, capitalizing text or trimming spaces)
- Formatting dates
- Performing calculations, such as currency conversions
- Validating and cleaning up data
- Applying conditional logic to data fields
- Error handling: include custom error handling in your JavaScript to manage issues gracefully without disrupting the upload.
Best practices
- Handle errors: add error-handling logic to your JavaScript so malformed data doesn’t disrupt the upload.
- Optimize performance: keep transformation code efficient, especially with large datasets, so uploads stay smooth.