
# Virtual Columns

**Virtual Columns** are one of CSVbox’s most powerful data transformation tools.&#x20;

You can run small snippets of JavaScript that can **merge**, **split**, **re-format**, **correct**, and **enrich** incoming data during a data import.

Super useful if you need to process your data, do calculations, merge things together, etc before receiving it at your end. The sky is the limit!

### How it works

1. For any sheet (template), add a Virtual Column via the CSVbox dashboard.
2. Attach a Javascript snippet to the Virtual Column.
3. After the users submit the CSV file, the Javascript will run to populate data in the Virtual Columns.
4. Data from the uploaded CSV as well as the Virtual Column will be pushed to the data destination.

#### Example

{% tabs %}
{% tab title="Merge" %}
Merge data from the *first\_name* and the *last\_name* columns into a new Virtual Column named *full\_name*.

Here is the attached Javascript for the *full\_name* Virtual Column:

```javascript
try
{  	
	return csvbox.row["first_name"] + ' ' + csvbox.row["last_name"];
}
catch(err)
{  
  	return 'error: ' + err.name + ' | ' + err.message;
}
```

{% endtab %}

{% tab title="Re-format" %}
Normalize the incoming *order\_date* into UTC format.

```javascript
try
{  	const date = new Date(csvbox.row["order_date"]);

	return date.toUTCString();
}
catch(err)
{  
  	return 'error: ' + err.name + ' | ' + err.message;
}
```

{% endtab %}

{% tab title="Static" %}
Pass any static value to the Virtual Column.

```javascript
try
{  	
	return 'Amazon';
}
catch(err)
{  
  	return 'error: ' + err.name + ' | ' + err.message;
}
```

{% endtab %}
{% endtabs %}

### Adding Virtual Columns

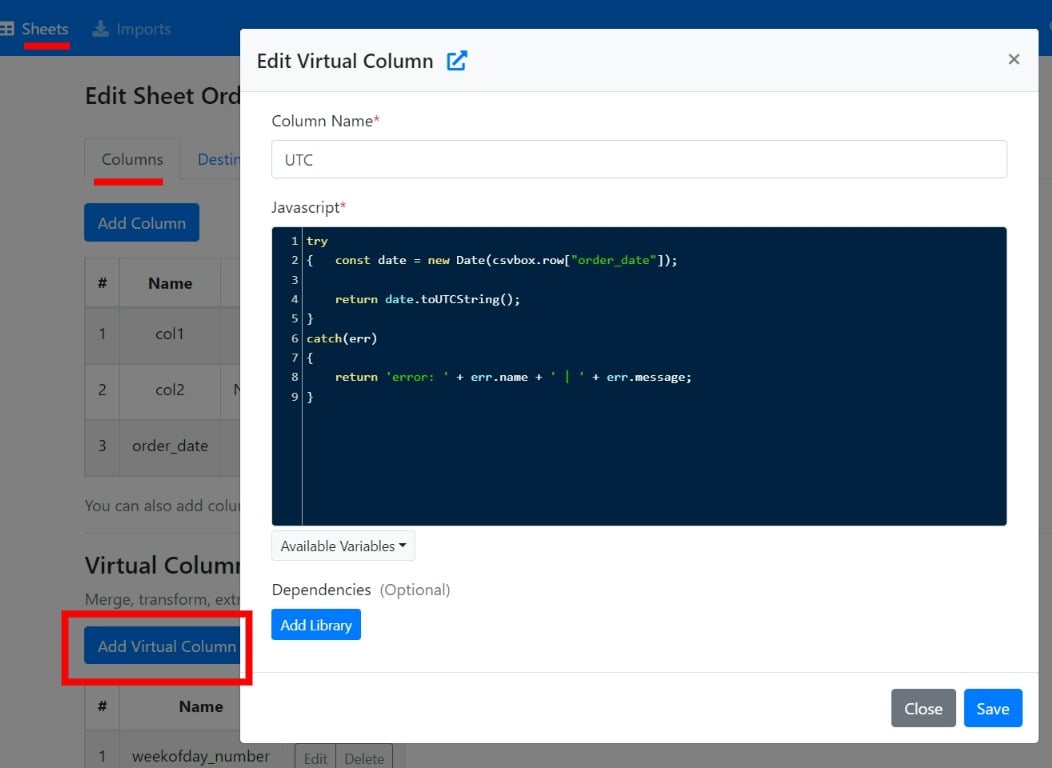
1. Go to the edit sheet page > **Columns** tab > Click **Add Virtual Column** button.
2. Add Virtual **Column Name**.
3. Provide **Javascript** code.
4. Attach **Dependent** libraries (optional).
5. Click **Save**.

<div align="left"><figure><img src="/files/lgxsG5QEKmtmdJPa1K7n" alt=""><figcaption><p>Add Virtual Column</p></figcaption></figure></div>

### Data Rows

Data rows are the core object that Virtual Columns are built around. For each incoming CSV data row, you can read its data and manipulate it via Javascript to add to the Virtual Column.

After the user submits the CSV, the Javascript will run for each data row in sequential order to populate Virtual Columns.

The `csvbox.row` object is available to work with each row. You can use `csvbox.row["column_name"]` to read the specific column of the data row. Utilize data from a single column, multiple columns, or no columns to process via Javascript and populate Virtual Columns.&#x20;

### Inserting Data into Virtual Columns

The value returned by the Javascript snippet is added to the Virtual Column.&#x20;

```javascript
// Extracting first name    
try
{  	var fullName = csvbox.row["full_name"].split(' ');

	// retruning value
	return  fullName[0];
}
catch(err)
{  
	//returning error
  	return 'error: ' + err.name + ' | ' + err.message;
}
```

{% hint style="info" %}
If Javascript returns a `NULL` value, an empty string will be added to the Virtual Column.
{% endhint %}

### Receiving Virtual Data

The Virtual Column data is available at all the data destinations along with the data from the regular columns.

{% tabs %}
{% tab title="API/Webhook, Zapier etc" %}
In the API response JSON object, the dynamic data will be displayed inside the **\_virtual\_data** object as shown below. The **\_virtual\_data** object will be visible only if the Virtual Columns are added to the sheet. In the example below check lines 12 and 31.

{% code lineNumbers="true" %}

```json
[
  {
    "import_id": 79418895,
    "sheet_id": 55,
    "sheet_name": "Products",
    "row_number": 1,
    "row_data": {
          "Name": "TP-Link TL-WN822N Wireless Adapter",
          "SKU": "AS-100221",
          "Price": "33.00",
          "Quantity": "3",
          "_virtual_data":{
		"SKU_prefix": "AS",
		"Compare_Price": "43.00"
           }
    },
    "custom_fields": {
      "user_id": "1002"
    }
  },
  {
    "import_id": 79418895,
    "sheet_id": 55,
    "sheet_name": "Products",
    "row_number": 2,
    "row_data":{
          "Name": "EPower EP-600PM Power Supply Cooling Fan",
          "SKU": "SS-103824",
          "Price": "95.35",
          "Quantity": "8",
           "_virtual_data":{
		"SKU_prefix": "SS",
		"Compare_Price": "105.35"
           }
        },
    "custom_fields": {
      "user_id": "1002"
    }
  },
]
```

{% endcode %}
{% endtab %}

{% tab title="MySQL, Bubble, Airtable etc " %}
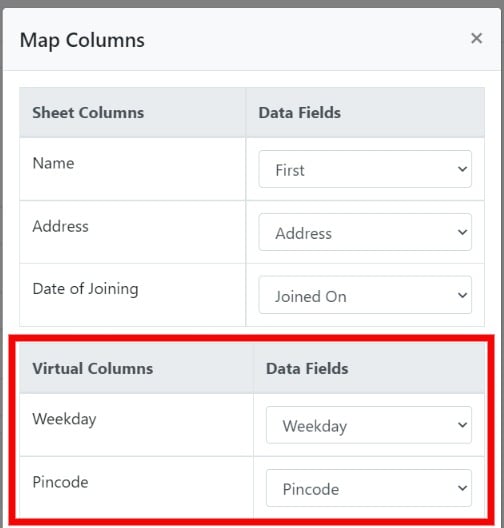
Virtual Columns will be available in the column mapping modal. You can push Virtual Columns to any receiving data field of your choice.

<div align="left"><figure><img src="/files/NX3QE0cJKcCA2nrhP8so" alt=""><figcaption><p>Mapping Virtual Columns</p></figcaption></figure></div>
{% endtab %}

{% tab title="S3, FTP etc" %}
In the AWS S3 file store, the Virtual Columns will be added as new columns in the uploaded file.
{% endtab %}
{% endtabs %}

The virtual data will also be available on the [client-side JSON object](/getting-started/3.-receive-data.md#data-at-the-client-side).

### Dependencies

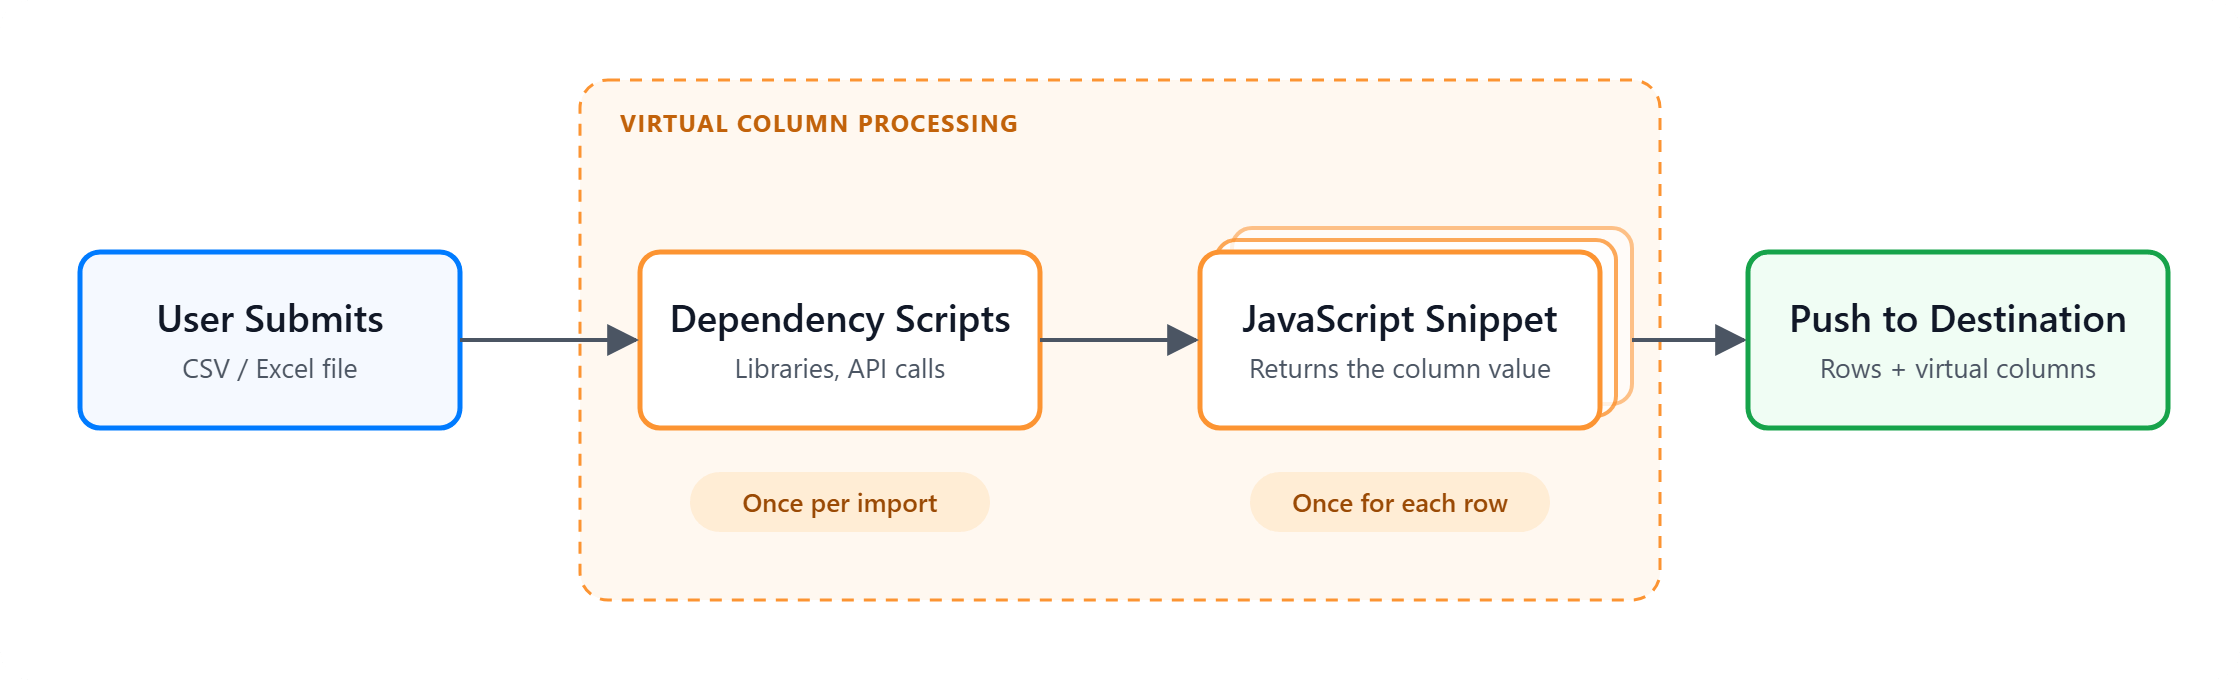
In the Javascript snippet, you can utilize an external library that is hosted via a CDN. You can also call any external API endpoint to fetch real-time data. Simply add the library script tag and/or any custom scripts to the 'Dependencies' section and start using it in the main Javascript snippet.

For each import, the dependent scripts will be run only once. Whereas the main Javascript snippet will be executed once for each row.

<div align="left"><figure><img src="/files/E1Xr7GwOGqe9Tt1OIXMt" alt=""><figcaption><p>VIrtual Column Processing</p></figcaption></figure></div>

<details>

<summary>Example</summary>

Consider you want to use the data from the incoming **USD\_amount** column to create a new **GBP\_amount** Virtual Column. The currency amount should be converted from USD to GBP using real-time exchange rates.

We can utilize the [Money.js](https://github.com/openexchangerates/money.js) library for currency conversions and [Open Exchange Rates ](https://openexchangerates.org/)for fetching real-time conversion rates. Here is the sample dependency code:

{% code title="Dependent Scripts" %}

```javascript
//Load jQuery via CDN
<script src="https://code.jquery.com/jquery-3.6.1.min.js" integrity="sha256-o88AwQnZB+VDvE9tvIXrMQaPlFFSUTR+nldQm1LuPXQ=" crossorigin="anonymous"> </script>

//Load Money.js via CDN
<script src="https://cdnjs.cloudflare.com/ajax/libs/money.js/0.0.1/money.min.js" integrity="sha512-dfZQaBBlTXvL+AUQKi7dd/9kb/KhreymnZYVdinjigqTdZUrAnLUNJRV34DUPFCdyek9mMBns3rzTlipnBKhTg==" crossorigin="anonymous" referrerpolicy="no-referrer"> </script>

//Fetch real-time conversion rates via ajax call and initialize fx object
<script type="text/javascript" >

    // Load exchange rates data via AJAX:
    $.getJSON(
        // NB: using Open Exchange Rates here, but you can use any source!
        'https://openexchangerates.org/api/latest.json?app_id=fa4744d77e844adb9cc3533b7ae162f3',
        function(data) {
            // Check money.js has finished loading:
            if (typeof fx !== "undefined" && fx.rates) {
                fx.rates = data.rates;
                fx.base = data.base;
            } else {
                // If not, apply to fxSetup global:
                var fxSetup = {
                    rates: data.rates,
                    base: data.base
                }
            }
        }
    );
</script>
```

{% endcode %}

Corresponding Javascript snippet for **GBP\_amount** Virtual Column:

{% code title="Javascript snippet" %}

```javascript
try
{  	
	//USD to GBP
	return fx.convert(csvbox.row["USD_amount"], {from: "USD", to: "GBP"});
	
}
catch(err)
{  
	//returning error
  	return 'error: ' + err.name + ' | ' + err.message;
}
```

{% endcode %}

</details>

### Variables

In the Virtual Column Javascript snippet, you have access to data variables included in the **`csvbox`** object. The following data is available:

#### `csvbox.row`

It contains row data. Each cell in the row can be accessed by providing the column name. Examples:

```javascript
csvbox.row["first_name"]
csvbox.row["order_id"]
csvbox.row["price"]
```

{% hint style="warning" %}
The column name must exist on the sheet or an error will be thrown.
{% endhint %}

#### `csvbox.user`

It contains the [custom user attributes](/getting-started/2.-install-code.md#referencing-the-user) defined while initializing the importer. Examples:

```javascript
csvbox.user["user_id"]
csvbox.user["team_id"]
csvbox.user["isAuthenticated"]
```

#### `csvbox.import`

This refers to the current import-specific data. The following data is available:

```javascript
csvbox.import["sheet_id"]
csvbox.import["sheet_name"]
csvbox.import["original_filename"]
csvbox.import["import_start_time"]
csvbox.import["destination_type"]
csvbox.import["total_rows"]
csvbox.import["row_number"] //current row number starting with 1
```

#### `csvbox.virtual`

It contains data from the preceeding virtual columns.

```javascript
csvbox.virtual["final_name"]
csvbox.virtual["age"]
```

#### `csvbox.environment`

It contains the [environment variables](/advanced-installation/environment-variables.md) that are passed during importer initialization.

```javascript
// Example Usage
if(csvbox.environment["user_id"] && csvbox.environment["user_id"] == "abc123") {
 
 // code
 
}
```

{% hint style="warning" %}
Data from only the virtual columns that are defined before the current virtual column are available for use.
{% endhint %}

{% hint style="info" %}
&#x20;***console.log(csvbox);***&#x20;

With this statement, you can print all the available variables in the debugging console,
{% endhint %}


---

# Agent Instructions: Querying This Documentation

If you need additional information that is not directly available in this page, you can query the documentation dynamically by asking a question.

Perform an HTTP GET request on the current page URL with the `ask` query parameter:

```
GET https://help.csvbox.io/advanced-installation/virtual-columns.md?ask=<question>
```

The question should be specific, self-contained, and written in natural language.
The response will contain a direct answer to the question and relevant excerpts and sources from the documentation.

Use this mechanism when the answer is not explicitly present in the current page, you need clarification or additional context, or you want to retrieve related documentation sections.